Installing on Amazon EC2
Step 1. Register for EC2
If you don’t already have an Amazon Web Services account, you will need to register for one and set up your credentials. Visit the EC2 homepage and follow the “Sign Up Now” link.
This process may take a few minutes and you will be required to verify your identity using a phone.
Note
Although every effort has been made to make this process as streamlined as possible, if you’ve never set up a server before, you may find it rather daunting. In this case we suggest pairing up with an engineer until you are through the setup process.
Step 2. Configure your Security Group
Before setting up your PANDA server, you will need to create a security group so that web requests will be able to reach it.
To do this, visit the Security Groups section of the EC2 Management Console. Click “Create Security Group”, give it a name such as “PANDA Security Group” and a description (anything you want), then click “Yes, Create”.
With your new security group selected click the “Inbound” tab in the bottom pane of the window. Add rules for HTTP, HTTPS and SSH.
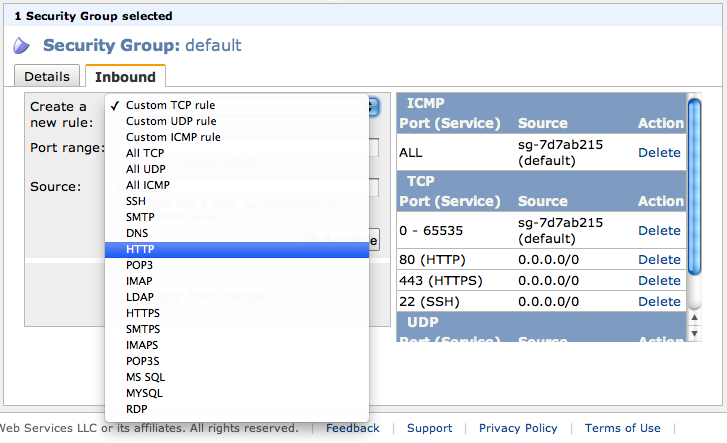
If you don’t mind your PANDA being accessible to anyone on the internet, you can enter 0.0.0.0/0 in the Source field for each. This will make your PANDA visible to the public. (Although it’s highly unlikely anyone would find it unless you gave them the link.) More discerning users will want to enter a private IP or subnet assigned to their organization.
Note
If you’re not sure what to enter for the Source field it would be wise to consult with your IT department to find out if your organization has a private IP or subnet.
Once you’ve finished adding those rules click “Apply Rule Changes”. You now have a security group for your PANDA server. You’ll use this in Step 3.
Step 3. Launch your server
Method #1 - Use an Amazon Machine Instance (AMI)
This is the absolute simplest way to make a PANDA.
Visit the Instances section and click “Launch Instance”. Select “Community AMIs”. Look at your upper-right corner of your screen to see what EC2 region your are currently in, for instance, then use the following table to lookup the correct instance for your region:
| Region | AMI |
|---|---|
| US East (N. Virginia) | ami-cb2407a2 |
| US West (Oregon) | ami-5a019b6a |
| US West (N. California) | ami-d8c5f49d |
| EU (Ireland) | ami-dc3ed1ab |
| Asia Pacific (Singapore) | ami-04431756 |
| Asia Pacific (Tokyo) | ami-b789e8b6 |
| Asia Pacific (Sydney) | ami-dbe778e1 |
| South America (Sao Paulo) | ami-45d27358 |
This is the official PANDA AMI. It may take a moment to return a result. When it does, click “Select”.
On the next page you’ll need to select an Instance Type. You are welcome to use (and pay for) a more powerful server, but PANDA has been optimized with the expectation that most organizations will run it on an m1.small instance. (See the FAQ for information about costs.) This should provide adequate capacity for small to medium-sized groups. We don’t recommend trying to run it on a t1.micro unless you will only be using it for testing.
Click “Next” and keep clicking “Next” until you get to “Configure Security Group” then select “Select an existing security group” and select the one you created in Step 2. Click “Review and Launch. Click “Launch”.
Note
If you have never used Amazon EC2 before you will be required to create a keypair. Even if you don’t know what this is, don’t lose it or delete it. It is the only way to log into your PANDA server should you ever need to.
Method #2 - Use a script over SSH
This method is slightly more complex and assumes you have some experience operating servers. It also provides greater feedback for users who want to understand more about how PANDA works.
Visit the Instances section and click “Launch Instance”. Select “Community AMIs”. Look at your upper-right corner of your screen to see what EC2 region your are currently in, for instance, then use the following table to lookup the correct instance for your region:
| Region | AMI |
|---|---|
| US East (N. Virginia) | ami-c5a98cac |
| US West (Oregon) | ami-6eb2295e |
| US West (N. California) | ami-02a99f47 |
| EU (Ireland) | ami-19cb266e |
| Asia Pacific (Singapore) | ami-a2de8bf0 |
| Asia Pacific (Tokyo) | ami-dd0a6ddc |
| Asia Pacific (Sydney) | ami-cb0498f1 |
| South America (Sao Paulo) | ami-eb3492f6 |
This is the official Ubuntu 12.04 AMI. It may take a moment to return a result. When it does, click “Select”.
On the next page you’ll need to select an Instance Type. See the notes above regarding instance types. We recommend you select m1.small.
Click “Next” and keep clicking “Next” until you get to “Configure Security Group” then select “Select an existing security group” and select the one you created in Step 2. Click “Review and Launch. Click “Launch”.
Once your new server is available, SSH into it and execute the following commands:
wget https://raw.github.com/pandaproject/panda/1.1.2/setup_panda.sh
sudo bash setup_panda.sh
The disadvantage of this method is that you will need to wait while the setup script is run. This normally takes 15-20 minutes.
Note
An installation log will be created at /var/log/panda-install.log in case you need to review any part of the process.
Step 4. Setting up your PANDA
Once you’ve completed your selected installation method you can will the web interface to complete setup. You can browse directly using to your instance using its “Public DNS Name”. Navigate to the EC2 Instances section and select your instance. The public DNS name will be listed among the instance details in the bottom pane. It will look something like this: ec2-50-16-157-39.compute-1.amazonaws.com. Visit this in your browser, like so:
http://ec2-50-16-157-39.compute-1.amazonaws.com/
Your PANDA will be running in setup mode. This guided process will give you an opportunity to create an administrative user. Once you’ve completed the setup you will be directed to login to your PANDA with your new administrative user.
You may also wish to configure DNS, E-mail and/or Secure connections (SSL).